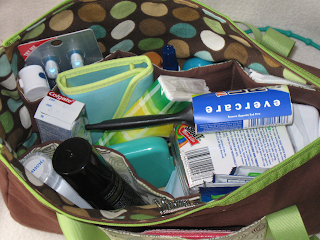
Most of this past week was spent working on my sister's bridal shower gift. I'd seen the idea of a "Brides' Rescue Kit" several places, and decided to make one for Grace. I made Mary Mulari's cosmetic bag from her book "
Made for Travel
" to contain everything. Once again, I proved that I can't make a Mary Mulari project without altering it in some way. This was my second time making the cosmetic bag. The first time I used a double sided quilted fabric that required me to drastically change the directions. This time I was just going to follow the directions, but ended up making a few changes.
First, I didn't like the way the inner pockets had worn in my original bag. I ended up cutting two pockets, one out of the bag fabric, and one out of the outer pocket fabric. I sewed them into a tube and turned them right side out; the remaining raw edges are hidden when the lining is sewn together. You can sort of see the two-tone pocket in the picture below.
Second, in step 5 there is a typo. It tells you to draw lines 3.5" from each edge of the bags outer fabric. These lines need to be 3" from the edges. Second, after stitching down the pocket sides, stitch two lines across what will be the bottom of the bag. I think I measured out 1-2 inches from the center. This will keep anything you put in the pocket from slipping down to the bottom of the bag. I've had this happen with my original bag, and apart from panicking when you can't find whatever slid down there, it can be rather difficult to get out.
Third, in step six, you sew ribbon and braid together. I didn't do this for either bag. For the first, it was because I was being lazy. For the second, I couldn't find any braid in the right width and color. The bag seems fine without it. Also in step six, instead of meeting the ribbon handle edges as diagrammed, I folded over one end and sewed it over the other raw end.
What's in it? Here's the list! (Most things are trial or travel size)
- Toothpaste
- Toothbrush
- Floss
- Listerine Spray
- Lip Balm
- Germ-x
- Spot Remover(s)
- Emery Board
- Clear Nail Polish
- Tissues
- 1'st Aid Kit
- Sewing Kit
- Nail Kit (clippers, tweezers, etc)
- Wet Wipes & Makeup Removing Wipes
- Mirror
- Hairspray
- Lint Roller
- Baby Powder
- Tums
- Feminine Napkins
- Safety Pins
- Bobby Pins
Some things I wanted to add, but couldn't find and/or ran out of time: Advil, Asprin, etc., mini Static Guard, and hand lotion.
 Ironically, after writing an entire post about linking to Amazon products, I have not linked to any Amazon product. Not to worry, though, my next post should have a few links. Meanwhile, I added four new altered notebooks/journals to my Etsy shop and apparently forgot to blog about it!


